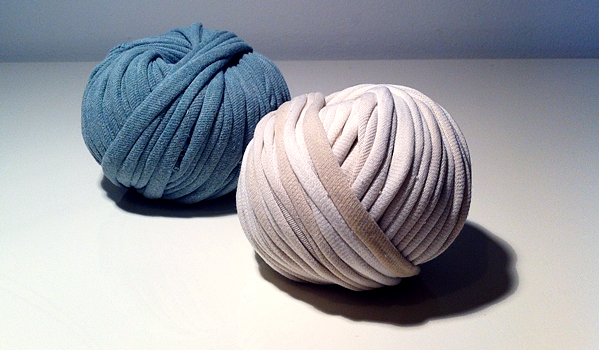

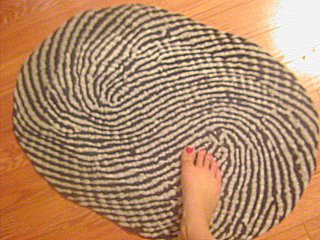
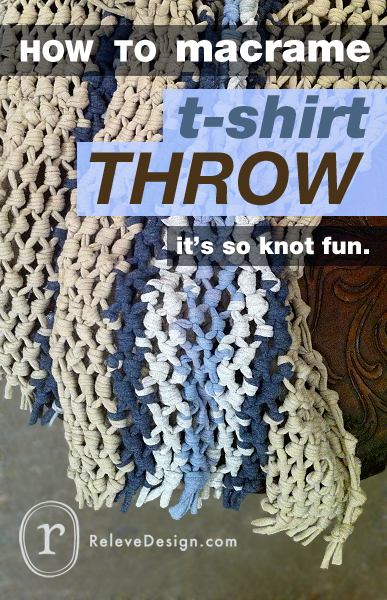
T-shirt yarn (tarn) is quick and easy to make. It can be used in an endless array of projects. Try to using it in crochet, weaving a bath matt, or making a trendy scarf. I’ve used it to create a macrame throw.
In the macramé t-shirt throw tutorial I recommend cutting multiple strips from t-shirts. This gives you strands that are shorter and thus easier to work with, but there’s a tradeoff. As those strands get shorter you have to attach new strands. The point of connection will leave you with a less finished look. Cutting continuous t-shirt yarn, is an optional technique you can use to make your macramé t-shirt throw a bit more finished.
If you use a longer strand you’ll have less of these connection points. Working with longer strands will still be more cumbersome than working with short strands, even if you spool them. You’ll just have decide what’s more important having more consistent knots or having strands that are easier work with. Just so you know, I went with shorter stands for the throw I made for Nate Berkus and used the single stitch joining method.
Supplies
- 1 cotton jersey t-shirts
To make this a true upcycling project use shirts that can’t be worn or donated to charity. You can start the throw with 1 t-shirt, but you can add more t-shirts as you acquire them to make the throw bigger. - 1 ruler
- 1 pair of scissors
- rotary cutter or X-Acto knife
How-To
- Fold your t-shirt, by bringing the right edge of the shirt, which is closest to you, towards the left edge of the shirt, which is farther from you. Don’t bring them together all the way. Leave about 2″ of space between them.
- Smooth out your shirt as much a possible. It doesn’t need to be perfect, but large creases can give your strips jagged, inconsistent edges.
- Cut off the bottom hem.
- Cut 1″ wide strips. Starting the cut from the right edge of the shirt down to the folded side. Notice the strip is still attached, because we left a 2″ allowance between the right and left sides of the shirt.
- Continue cutting out the rest of the strips.
- When you reach the sleeves. Start your cut from the left edge of the shirt this time to fully separate it from the remaining portion.
- Open up the shirt and insert your hand through all the loops. Notice the right slit and the left slit.
- Cut towards the left slit diagonally from the outer edge.
- Now starting from the right slit cut diagonally towards left slit.
- Repeat this until all the left slits have been cut.
- For the last cut, start from the right slit and cut towards the outer edge.
- Stretch the t-shirt strand to curl in the edges. Be careful to make sure the edges curl in evenly. To ensure, this untwist the strand before stretching.
- Stretch the t-shirt yarn a second time going in the opposite direction to ensure it’s fully stretched and curled.
Useful tips
- This technique can also be used with plastic bags to make plarn or plastic yarn, with the exception that you won’t need to stretch the plastic bag to finish it.
- Not sure what else to make with your tarn? Here are a few projects you can try.


128 replies on “HOW TO cut continuous t-shirt yarn”
[…] T-shirt yarn […]
[…] found this great tutorial and video, showing how to make t-shirt yarn from strips of t-shirt material or jersey knit […]
[…] http://www.relevedesign.com/how-to-cut-continuous-t-shirt-yarn/ […]
Nice idea! I have tons of old tees perfect to be recycled into a yarn, that can be used for creating so many nice new things. Thanks for the inspiration!
That’s great, Lindsay. I’m so glad your old tees are getting put back to work! Thanks for visiting!
Thank you so much for this tutorial!
Its so simple and effective.
Thanks for visiting and watching, Mari!
[…] 5. Turn t-shirts into yarn […]
[…] relevedesign, […]
Thanks for the video on how to make T-shirt yarn. This is much faster and easier than cutting one strand at a time like I was doing.
Hi Zoe. I’m so glad you found the video it helpful! Thanks for taking the time to visit and write. Happy tarning!
[…] Continuous T-Shirt Yarn from Relev??Design […]
Thanks for the video tutorial! I’m a crocheter who is getting into yarn dyeing, and I’m doing this with my two kids today during the snow. I’ll be having them fabric paint a bunch of old white shirts before I cut them into yarn. 🙂 I have previously made plarn tote bags and look forward to making some stuff from colorful recycled t-shirts.
Hi Jen! Using fabric paint on the old shirts is a very clever idea. You’re a genius! Thanks for visiting and taking time to give us that great tip. Stay warm!
[…] Breathe new life into old t-shirts by converting them into a long continuous strip of fabric which can then be woven, crocheted or knitted into a variety of useful items! Rugs, baskets, and […]
[…] ??? ??????? ????????? ???? ??? ??? ?????????(????? ???). ???????? ?? ????? ??? ?? 35 ?????? ??? ??????? […]
[…] K?rbchen und Utensilos. Oder: tolles Strickgarn. ? Anleitungen gibt es zum Beispiel hier. Dann k?nnen aus dem Stoff sogar gestrickte oder gewebte Dinge werden. Aus einzelnen Streifen […]
[…] it or do just about anything you would do with yarn or ribbon. Photo source and tutorial here For step-by-step instructions, here?s a great tutorial that I found on how to cut t-shirt yarn […]
[…] to begin cutting strips! ?I followed this tutorial by Revele Design. ?It was so incredibly clear and had a video explaining the whole process. ?It […]
g?nial!merci beaucoup pour cette vid?o j’aime recycler c’est ?cologique et ?conomique, super!
Bonjour, Christine! Merci de votre visite et de prendre le temps d’?crire!
Dear Bao,
I would like to use your method for making t-shirt yarn. But all my t-shirts have seams at both sides. Does it work with that kind of shirts? Or will the yarn fall apart?
Thanks for your answer.
Hi Lucy! You can definitely use t-shirts with seams. They won’t fall apart. I actually put up a post about it. Check it out (http://www.relevedesign.com/side-seams-and-t-shirt-yarn/)! Thank for stopping by and taking the time to write!
I’m left handed and directions often look backwards to me. I’m having the hardest time getting the end cutting part correct – and have messed up twice now. I’m not going to give up though. I have watched two of the tutorials – with two different people doing it & thought I had it down, but the second time I had lots of circles instead of a long “string” of fabric! I did loop the circles together and made a ball with them & I will do something with it anyway.
Hi Patricia. I think the reason why you are getting a bunch of loops instead of one long “string” of fabric is that you are skipping the first cut. You need to cut from the outer edge of the shirt to the first slit. Here is the link to the video starting at the step that I think you are missing (http://youtu.be/V3xJ_W6vYN4?t=2m25s). So if you are left-handed and have your right hand inserted into the loops, cut from the outer edge to the right slit.
Please don?t hesitate to write if you have more questions. Thanks for taking the time to visit the site, watch the video, and write, Patricia.
The video on joining two pieces of t-shirt together (with a single crochet method) does not play. How can I get instructions to join two pieces of t-shirt that are ready to crochet with?
Hi Sharon. I’m sorry about that. Try visiting the following tutorial page which has the video embedded (http://www.relevedesign.com/how-to-make-a-macrame-t-shirt-throw/). It’s the second video from the top. You can also go directly to the video on YouTube (https://www.youtube.com/watch?v=_Hc8c_RDrrM).
Thanks for taking the time to visit the site, watch the video, and write, Sharon!
The video cleared everything up for me but one piece. When you fold the bottom to the top ( I can’t remember if it was left to right or right to left) I understand that I leave a 2 inch gap and that I cut right to the beginning of that. What I can’t see, is whether or not I will cut through the seam on the bottom side. I know that the far top side needs to stay intact until all of the slices have been made and then I’ll cut those with scissors as you demonstrate. But do I have to cut what would be the other seam in the shirt as I’m making those slices? This will make or break my success with cutting t-shirts, so I hope you understand what I’m asking!!
Hi! I you’re completely correct about the far top side needing to stay intact. You will need to cut through the seam on the bottom side. That’s an excellent question. Please don’t hesitate to write if you have more questions. Thanks for taking the time to visit the site, watch the video, and writing.
[…] est un fil fait ? partir de jersey, on peut en fabriquer soi-m?me avec de vieux tee-shirts (tuto ici) ou l’acheter dans le […]
[…] 8. Finger-Knit Necklace – Grab an old t-shirt and turn it into a stand-out addition to your accessories with this tutorial by Keep on Bobbin Along. Need a tutorial for making t-shirt yarn? Try this one from Releve Design […]
[…] I det h?r fallet fuskade jag faktiskt och anv?nde k?pt trik?garn, men du kan enkelt g?ra ditt eget garn av gamla T-shirtar s? h?r […]
[…] find that the strip will automatically curl the raw edges in for you. If you are tricky, you can make one really long piece of “t-shirt yarn” using this […]
[…] Directions here. […]
[…] Therefore, I decided to use old t-shirts instead. I also liked the idea of upcycling them, so I started collecting my old t-shirts, but it took several months until I finally had enough to start a rug. I cut them up following this tutorial. […]
[…] it was a wool/ acrylic blend, but don’t quote me on that) with some t-shirt yarn I made (here’s a tutorial on how?to make t-shirt […]
Excellent tutorial and easy too! I can’t wait to upcycle my old shirts!
Cool! Thanks for visiting and taking the time to write, Jen!
Please note that this technique works best on tshirts that don’t have seams at the sides. Some tshirts are continuously knitted like a sock, and some are pieced and so have seams. Ones with seams will leave a bump in the yarn
That’s very good point, Joann! I just think of those bumps as slubs. 😀
Thanks for visiting and taking the time to give us that very helpful tip!
[…] you don’t have any skewers, you could do this with other scraps of yarn, or even t-shirt yarn to make a thicker […]
[…] There is written pattern the make continuous T-shirt yarn on the site: To read more Click Here […]
Hi there!
Wonderful tutorial!!
Just wondering if you have a technique to join the ends of the t-shirt yarn seamlessly, instead of knotting?
Also, in your video, you cut the strips 1 1/2 inches (if I remember correctly). After stretching, do you have an idea on what gauge yarn that would roughly correlate to?
Thanks so much!!!
Ann
Glamour4You
Hi Ann. I go over three was to join two ends of t-shirt yarn in my post “HOW TO make a macrame t-shirt throw” (http://www.relevedesign.com/how-to-make-a-macrame-t-shirt-throw). Check out the second video “HOW TO connect two strips of t-shirt yarn”. The tarn gauge is about 2-2.5 stitches per inch. I hope that helps! Thanks for visiting and taking the time to write!
I’ve really enjoyed this! Everything worked perfectly well. Can’t wait to use my tarn.
That’s wonderful! I so excited for you to put that tarn to use. Thanks for stopping by and writing, Lauren!
[…] your favorite tee) continuous yarn that you can then use to crochet, knit or knot. Check out this video tutorial by Relev? Design to learn […]
can we make the strips smaller? instead of an inch and a half can we do say maybe 3/4 inch?
Hi, Brandi. You sure can! I wouldn’t make the strips thinner than 1/2 inch, cause the jersey could unravel when you stretch the strips to finish the tarn. Thanks for visiting and writing! Tell me how it goes!
Thank you for sharing this wonderful tutorial. I just had a thought that might add something. For those of us who want an even longer piece of yarn, I bet it would be smart to take the flat cut t-shirt fabric and sew it to another piece of cut up t-shirt fabric _BEFORE_ stretching it. You could do this until you have one big seemingly endless ball of t-shirt yarn to knit or crochet with _WITHOUT_ having to attach yarn during knitting or crocheting – meaning there’s a less noticeable join point. My mom used to do that with rags that she cut up for making rugs on a loom. I had no idea how to create t-shirt yarn before your tutorial – thanks so much – I see a tunisian crocheted bathmat might be sturdy and soft!
Hi, Lynn! That’s definitely a great idea! For many projects sewing two long strands together before stretching would be the best way to get the seamless join. Thanks so much for visiting and taking the time to offer up this helpful tip!
Bao, THANK YOU! This was so easy and I look forward to starting my new project: a crocheted throw rug out of my husband’s old t-shirts. Thanks again!
Gosh, Mrs. RD! I’m so excited for you! I’m sure the rug will be beautiful! Thanks so much for visiting and writing!
I have great ideas for t-shirt yarn. Unfortunately, I can’t get the video to play, it is simply a big black box with nothing to click on! Where can I find photos of the steps to cut the shirts?
Hi, Vicki. I’m so sorry about that. Technology can be such a pain sometimes! I’ll draw a diagram for you and post it on the page. Thanks for taking the time to write to me!
Finally, a better use for my husbands worn work tees than rags or the trash can. I see a new kitchen rug in our future.
That’s wonderful, Eden! Yes, worn out clothes can definitely be turned into nice decor! Thanks for taking the time to write!
Hi, this tutorial is so smart..I love it!! I am making a carpet to the living room with this amazing idea.Thank you so much, greetings from Chile
Awww, gosh! You’re too kind! I’m so glad you like my tutorial. A carpet for your living room sounds amazing! I’d love to see it when you’re done!
Muchas gracias por escribir y me visita!
I’ve just come across you on the great, bit World Wide Web and I’m thrilled to have done so. I love your ideas which are so original. This t-shirt yarn is very clever 🙂
This has just given me thousands of ideas! Thank you so much on a thorough explanation! It’s always hard to find good instructional videos =)
Will definitely attempt to make a throw, I have so many t-shirts to get rid of!
I’m so glad to hear that, Aly! I’d love to see what you come up with!
Thank you soooooooooooooo much!
Do you allow me to translate this tutorial in French for my blog?
Thanks again
Natacha
Even with the sound off on my computer, your video was still very clear and concise. Thank you for your video, i appreciate you sharing with everyone!
[…] already plan on making some t-shirt yarn and making a no-sew halter (or more than one, if it turns out great!), to put away for […]
Fabulous and very detailed, easy to follow tutorial. I may actually crochet something with t-shirt yarn now! So excited, and thank you for the tutorial!
Hey YankeeGirl! Thanks for the visiting and commenting. Tarn is so fun to use. I can’t wait for you to crochet with it!
[…] happened to have an entire stash of old T-shirts just begging to be?re-purposed? so we found this wonderful tutorial and began slicing […]
If you want to make a center-pull yarn ball, this will make the yarn easier to work with (no rolling around) for these long strips. This is how I learned a long time ago, before I had a yarn winder.
http://birdsnestknits.typepad.com/birds_nest_knits/2006/02/how_to_wind_a_c.html
I use paper towel rolls to wind my yarn and make center-pull balls, but this really wonderful tip! Thanks for sharing, Christina!
[…] own?continuous t-shirt yarn, with which you can make numerous other projects. Substitute it for regular yarn used to crochet, […]
Great tutorial! Tried it with an old leather jacket (thinner strips) and it worked great 🙂
You ROCK! I have avoided tarn because the idea of dealing with strips was way too much of a pain! This is incredibly easy and I can’t wait to try it out! Thank you…
Hi Andy! Oh yeah, dealing with individual strips can be a drag. I’m so glad my tutorial helped. I so excited for you! Thanks for visiting and taking the time to write!
This is such a great idea! I wish I had found this earlier when I was weaving my slippers – had so much trouble joining the short bits together! Thank you so much.
Hi Agy. I’m so glad you found it helpful. You might find my tutorial on joining strands helpful too (How to connect two strips of t-shrit yarn – http://www.relevedesign.com/how-to-make-a-macrame-t-shirt-throw/). It’s the second video on the page. Thanks for visiting and taking the time to write!
Great, will take a look 🙂
very helpful tx fo sharing
Glad found it informative. Thanks for taking the time to write, Sheraa!
[…] Or how about tee-shirt yarn! You can crochet or knit with it. Make your own throw rugs or hats? The instructions along with a video tutorial can be found here: ?http://www.relevedesign.com/how-to-cut-continuous-t-shirt-yarn/ […]
This is a very clear tutorial, one of the best I have stumbled across. Once I’m done with wedding crafting, I’m going to get back into the habit of knitting, and I think I’ll make a project with this T-shirt yarn. Also, thank you for buying a tripod–I get so frustrated when people post tutorial videos online and they are so shaky that it’s impossible to watch!
Hi Erica! *Whew*! Oh GOSH, Thanks! I’m so glad the video works for you. I actually don’t have a tripod or a dedicated camera. For now I have to make do with my iPhone and a candelabra. I’ll invest in some equipment for better production values later when I get the funds! Have fun finishing up your wedding crafting and enjoy the tarn knitting. BTW, happy belated b-day! Thanks so much for taking the time to write to me.
[…] your favorite tee) continuous yarn that you can then use to crochet, knit or knot. Check out this video tutorial by Relev? Design to learn […]
[…] so it appears to be more woven than knitted. For my own experimenting I was inspired by this how to to try turning a pile of my mum’s old t-shirts into something new. Cutting t-shirts into […]
Brillant!!!!! Thanks for the video!
Glad you like it, Jolleen. Thanks for visiting, watching, and writing!
this… is…. GENIUS!! thank you so much for the idea and video! 😀
Rachael
I’m so happy the method works for you. Thank YOU so so much for visiting, watching the video, and taking the time to write to me. XOXO
Brilliant! Thanks so much for the video tutorial. It was so much easier seeing it done. I love the fact that you can also use this for plarn. The way I was doing it took way too long!
When I first started making plarn (and tarn) I was using a time consuming method too. I was linking the loops together, which makes those little bumps. I’m so glad I was able to help you learn a new technique. I find it to be easier and faster. Thank you so so much for visiting, watching the video, and for writing to me, Cindy! Happy plarning and tarning! 🙂
[…] myself.? I found a great online video giving detailed directions on how to make t-shirt yarn by Releve Design, which works perfectly for making layered t-shirt scarves.? The only difficulty I faced with this […]
What a clever technique!I have tons of ideas about what to do with this stuff.Thanks for the info!
I’m so glad you find the tutorial useful. What kind of projects do you have planned? Thanks for visiting, watching the video, and writing, Mary! 🙂
[…] relevedesign.com via MayaB on […]
[…] Hier habe ich eine super Anleitung gefunden,? wie man aus einem T-Shirt dickes Garn machen kann. Das Garn kannst du sp?ter benutzen um K?rbe, Sitzpuffs oder Badematten zu stricken. […]
I just cut mine spiraled, it’s easyer
This is so awesome, can’t wait to knit something!
I’m so glad you like the tutorial. T-shirt is so fun to use! Thanks for visiting, watching, and writing, Carmen! Much appreciated! Enjoy!
I love this. I am having a problem getting my tee-shirt yarn to curl though. It does not seem to curl at all. I’ve tried several 100% cotton tee-shirts. I’m not sure what I am doing wrong. I was also told that the shirt should have spandex in it. Is this true or am I just doing something wrong?
OH NO!! Well, if there are graphics on the t-shirt or some other type of coating it will prevent the t-shirt yarn from curling. I hope you can still use the yarn for one of your projects even if it doesn’t curl.
Make sure to stretch your t-shirt strand lengthwise. That should make it curl. Tell how if it works out.
Thanks for visiting and writing, Sheila!
I have cut a tee shirt in strips and it wants to curl to the wrong side. One side of the shirt is red with designs and the inside is white. I want it to curl to the red side.
I think we’re a bit out of luck on that one. The cotton jersey will naturally curl to side. If you want to force it…you could fold the strips with the side you want hidden inside and then sew it up. It’s a much more work then letting it follow it’s natural curl, but if you’re handy with a sewing machine it would be doable.
I love this. I am so doing it today with some retired t shirts.
So glad you like the tutorial! I’m have to make some t-shirt yarn today too after I find some t-shirts to retire. Thanks for visiting me, watching the video, and writing, Angela! By the way, your photography is wonderful!
Great video and information! Thanks!
Thanks for visiting me, watching the video, and writing JessieJune. I’m so glad it was helpful!
This tutorial is awesome! I had read that you need t-shirts without side seams to make the continuous yarn, but your tutorial doesn’t mention that. Did you use shirts with seams? If so, did it impact the curling? I am not sure I have ever seen a t-shirt without seams. Thanks!!!
Hi Carissa. In the video I used an old undershirt which didn’t have seams. You can definitely use t-shirts with seams. I use t-shirts with seams all the time. The t-shirt yarn will still curl, but you’ll have a noticeable bump in the t-shirt yarn. I’ll post a picture of what I do to minimize the bump.
Seams really aren’t that disruptive to proper curling of t-shirt yarns. It’s printed graphics that cause problems, so it’s best to use plain shirts. If you need very consistent yarn it’s best to use plain seamless shirts. Let me see if in can figure out another method to make completely smooth continuous t-shirt yarn from shirts with seams. Thanks so much for visiting me and asking great questions, Carissa!
[…] Recycle and old t-shirt and learn how to cut continuous t-shirt yarn at Releve Design. […]
Im going to try a scarf out of an old under armour t-shirt! That will be perfect for wicking away moisture while doing winter sports!
I’ve never considered cutting up a stretchy Under Armour shirt. Wow…now that’s different! You’ll have to keep me updated on how it goes! Thanks for writing in, Angie!
i have a ton of tee-shirts, so thanks for the great idea
Thank you so much for this tutorial, which I found through Pinterest. When I read the article, I wasn’t understanding how to start cutting the strips, but the video was very helpful to a visual learner such as I am. I’m now ready to turn my hubby’s old t-shirts, which I have over-dyed, into a large basket for my kid’s toy 🙂
I’m a visual learner too. I’m so glad the video helped.
Wow, that sounds like a cool project! I’d love to see how it turns out. Thanks for visiting me and for writing, Cecilia.
Thank you for this. Brilliant video. Im going to cut some t shirts up and knit a tote bag. Thank you.
Thanks for visiting and commenting, Sarah! Tell me how the tote comes out!
Nice, clear video–thank you for this very complete explanation! I hadn’t thought of the stretch & curl step, which makes all the difference in the final product.
Hi Teaf5! Gosh, you’re more than welcome. I love the stretch and curl step myself. I find it very satisfying, like popping bubble wrap. 🙂 Thank you so much for visiting, watching the video, and commenting! I truly appreciate it!
[…] primero: cortar las camisetas en tiras, pod?is ver como se hace?aqu?.?Cuando tengas los ovillos, si lo prefieres, puedes te?irlos a tu gusto, como los de la imagen de […]
[…] I was browsing on Pinterest and I?ve seen loads and loads of T-shirt upcycle projects. One being T-shirt Yarn . I love to crochet and knit so of course I had to check this out. Then I came across some really […]
Do you have a picture of the finished project? Did I miss it somewhere?
Thanks! Can’t wait to try this!
Hi Kelli! I made the t-shirt yarn tutorial as a supplement to the my “HOW TO make a macrame t-shirt throw” I came up with the project for Nate Berkus, which reminds me…I need to post up that episode on here. Thanks for visiting me and for writing! 😀
this is wonderful! it’s going to save me sooo much time on my crocheted tshirt run I am working on for my kitchen.
Thank you, thank you, thank you!
YAY! That’s great! I’m so glad I could save you some time! Thanks for visiting me and writing, Sylvia!
Hi,
That was a wonderful video. I always had trouble cutting even T-shirt strips. Now this has helped me a lot.
Regards,
Resmi
I’m so glad I was able to help you. Thanks for visiting and for writing, Resmi!
Is there a way to get a picture of this technique sent to me. I am not quite getting it.
Thanks
OH NO, Cindy! Let’s see if we can get you started! Would you mind telling me where you getting stuck? Check out the video, if you haven’t done so already. I walk you through step by step through the entire process. You can also pause the video at any point to take a closer look. Thanks for writing!