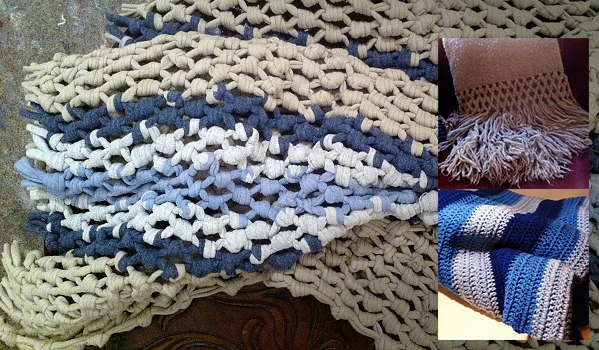

This throw is actually a piece I designed for Nate Berkus when he challenged me to decorate a living room. It started out as a bath mat. Obviously bath mats don’t belong in a living room, so I suggested a throw. The technique I used to make the bath mat couldn’t be used to make a throw, so I had to figure something else out.
Early this summer I had I splurged on a high-end throw from a company called Sefte. They make amazing pillows, throws, and bedding. I liked how the throw was finished with widely spaced knots. My boyfriend’s mom had also crocheted a blue striped blanket me. I thought it would be great to combine aspects of both to make an interesting textured throw. Let’s make it better!
Supplies
1 cotton jersey t-shirts
To make this a true upcycling project use shirts that can’t be worn or donated to charity. You can start the throw with 1 t-shirt, but you can add more t-shirts as you acquire them to make the throw bigger.
1 ruler
1 pair of scissors, rotary cutter, or X-Acto knife
thread and sewing needle (optional)
How-To
- Determine your color palette, striped pattern, and width of the throw.
- Lay a t-shirt flat on your work surface.
- Cut the bottom hem of the shirt off and set it aside.
- Cut 1″ wide strips horizontally from a t-shirt following the hem. Continue cutting strips all the way up to the sleeves. You will end up with cloth loops.
- Stretch the loops out. This will lengthen the loop and curl in the raw edges of the strips.
- Cut each loop to create strands.
- Cut the hem loop open. The hem strand should be at least as long as the desired width of the throw. If it isn’t then lengthen it by attaching another strip to it with an overhand knot.
- Using overhand knots, attach the strands to the hem strand, spacing each strand 1″ apart until the strands span your desired width.
- Grasp the two left most strands.
- Using overhand an overhand knot time them together.
- Grasp the next two strands and tie those together, again using an overhand knot. Continue till you finish the tying all the strands. If you have a remaining odd strand, you can remove it or add another strand to the hem strand make an overhand knot.
- Starting from the left again, skip the first strand. Grasp the second and third strand and tie those together allowing 1″ space between this knot and the previous row of knots. Continue knotting this row. There will be one odd strand at the both ends of this row.
- Starting from the left again. Grasp the first two strands and tie those together allowing 1″ space between this knot and the first row of knots. Continue knotting this row.
- Repeat steps 12 and 13 until the stands are about 6″ long. If you have more stands available simply overlap the stands and continue knotting. There will be loose tag ends. These can be cut off later.
- Repeat steps 12-14 until you use up all your strands or reach the desired length. You can remove the hem strand anytime after you’ve finished three row of knots but untying the strands from the hem strand.
- To finish the throw cut the ends of the strands to the same length forming a fringe.
Drape this throw anywhere that could use a bit of punchy texture.
Useful tips
- This throw is decorative. If you feel compelled to make this for warmth, make your t-shirt strips 1″-1/2″ wide to create smaller knots. Then minimize the amount of space between each knot as well.
- To create a softer throw, do not tighten the knots completely. Keep the knots looser.
- This is a time consuming project so if you want to make it as a gift, make sure to give yourself at least a week and half to work on a decent sized throw.
- You can also use the throw as wall hanging.
- Make the project skinnier to use it as a runner.
- Every 24″ of t-shirt yarn will yield about 8″-12″ in length after knotting. This is with 1″-3/4″ space between each knot with knots that are fairly tight.
- Check out the continuous t-shirt yarn tutorial to give your throw a higher level of finish.
28 replies on “HOW TO make a macrame t-shirt throw”
[…] Snuggle up under this throw blanket made from all of your favorite old […]
Thank you so much!
This technique is very simple and beautiful, perfect to my home projects.
Thanks for visiting and watching, Pauline. I’m glad you can put your tarn to good use!
[…] Macrame T-shirt Throw: Relev Design transforms commonly discarded materials into new useful lighting, home accessories, and furniture. By injecting a hefty dose of design into upcycling, we make beautiful and desirable objects that happen to be eco-friendly too. (via Relev? Design) […]
[…] Source […]
I am curious whether this would work using square knots instead of overhand knots. I like the symmetry of square knots, and they probably lie flatter.
Hi Melissa! I only used a square knot, because most people know how to tie one. If you can do a square knot, kudos! You’ve got a brilliant idea. Thanks for visiting and taking time to give us this wonderful tip!
What a great idea! I was poking around on Pinterest, found one of your tutorials on how to cut T-shirt yarn and then found this. I try very hard to be a DIY person and I hate the idea of giving up all those T-shirts my husband used when he was in the USMC. This will give me something to do this winter and I know he’ll love the results. Thanks so much!
Hi Genie. An USMC throw? Now that sounds cool! Thanks for stopping by and taking the time to share. I can’t wait for you get started!
hey, thanks for posting this you made it really clear in the video i will do this as soon as i get enough t shirts
Hi, Hannah! The great thing is that you don’t have to wait and make a t-shirt throw all in one sitting. It could actually be pretty grueling to do all at once!
You can cut up each shirt and turn them into balls of t-shirt yarn as you get them. Thanks for visiting and taking the time to write. I can’t wait for you to get started! 😀
[…] Si prefieres aprender los nudos mirando v?deos explicativos, los encuentras en este enlace a los?nudos simples para tejidos en relevedesigns. […]
Thank you so much for this great design!!
I grabbed a old silk shirt to see if would work due to a idea I have and it does. I’m so excited now! My gran past away a year ago and she had a lot of silk and chiffon style items that will make beautiful yarn. I will use some of her pretty items (the ones my mom and aunt decided not to keep) and make them a beautiful decorative throw. They will treasure this forever, I’m sure.
I was able to use the sleeves out of a long sleeve shirt also! And I have a old skirt in mind that will make a very large ball of yarn, I have already started cutting it and it is working beautifully. I’m sure there is enough for one project out of this one long skirt.
Thank you again,
A new fan 🙂
Hi Heather! I’m sorry to hear about your gran. 🙁
I’m glad you’re putting all the old items to good use. I’m sure the throws will come out wonderfully. Tell me how it goes. I’d love to see them when they’re finished!
Thanks for taking time to visit and write!
I think this technique would also make a nice looking scarf.
Thank you so much for the videos! You are so clever, I can’t wait to make one of these! 🙂
Gosh, Alyse, thanks for kind words! If you need have any questions don’t hesitate to ask!
Bao,
Thank you so very much for the tutorial. When I saw this on the NB show I was very interested in getting started. My son who is now in college has lots of t-shirts that I had been saving to make a throw/quilt. I saved some t-shirts from when he was a toddler, just couldn’t bear throwing them away. I can’t wait to pull them out to get started on this project, hopefully I’ll be finished before he finishes school.
Hey Leslie. Well, thank YOU for watching the show, and thanks a whole lot for visiting me!
If you plan to make the throw as a keepsake, you might want to take a look at HOW TO tie overhand knots, so you can make the knots extra perfect. You should also look at HOW TO cut continuous t-shirt yarn because you can make a longer strand of yarn from the toddler’s shirt. The throw you saw on the show was a plain striped pattern, but you can get more creative with different patches of color like Norma did with her sons’ child-sized t-shirts or even zigzag patterns.
Send me pictures. I’d love to see how it comes out! Good luck!
Fabulous project Bao..
I admit it was this one that really caught my eye when I saw you on the NB show.
After Christmas I’m off to the charity shop to get some T’s to use for a throw..
I think I’ll donate my first effort back to them.. should go for more than a couple of old T shirts.
Keep up the great work.. you are truely innovative.
Jo xx
Hi, Jo! I’m so glad you like the project! Thanks for watching!
I get my t-shirts from friends and family, but you buying it from the charity thrift store and giving it back to them to sell again…now that’s something I didn’t even think of. Look at you being all cleverly charitable, you smarty pants! I hope they mark it up higher than the total value of the shirts! Now that would be amazing!
I’ll keep working on Relev? Design as long as you keep reading and commenting! 😀
I’m truly flattered. Thanks so so much for commenting! And, again, thanks for watching!
Thanks for watching!
Oh…gosh…My sincerest condolences. I’d suggest making this a wall hanging instead as Nate mentioned on the show, so that it doesn’t get worn with use, unless you’re set on using it as a throw.
This is such an important keepsake, I think I’m going to need to give you a few more tips to push the craft level a notch higher. If you can, hold off on the project! I’m going to make you a video that takes a very close look at making neater, consistent overhand knots, that I think you should use. The level of detail will make the process much slower, but the finish will be higher. I want to help you make this project truly worthy of your husband’s memory. Does that work for you?
Thanks, Gamma, and merry Christmas to you and your family.
Oh wow, Bao. What a wonderful thing to do for Gamma. I am so glad I visited this site this morning! It is a blessing =)
Making a bigger more consistent throw takes time, so Gamma is giving herself a quite a bit of time to work on it! Thanks for visiting and commenting, Robin!
How many t-shirt were needed for your throw?
Hi, Gamma. I used 15 adult sized t-shirts for that was on the show it’s about 2.5’x5′. I’m teensy weensy so it’s big enough for me. For a larger one I would do at least 20 or even 30.
Every 24″ of t-shirt yarn will yield about 8″-12″ in length after knotting. This was with 1″-3/4″ space between each knot with knots that were fairly tight. You can get more length with tighter knots and more distance between each knot, but then the throw starts looking more like a net.
I hope that helped.
Thank you so much for your prompt reply. I had recorded the Nate show and just watched it today.
My ex died last December and had dozens of t-shirts. I thought this would be a great use of them to give to my 2 adult kids as a remembrance of their dad.
Happy Holidays…
What a great idea! I hope you were able to do the throws and that they turned out wonderful!